Configuration
The GA4GH reference server has two basic elements to its configuration: the Data repository and the Configuration file. The repository is most easily configured via the Repository manager command line tool.
Data repository
Data is input to the GA4GH server as a directory hierarchy, in which
the structure of data to be served is represented by the file system.
At the top level of the data hierarchy there are two required
directories to hold the top level container types: referenceSets and
datasets.
Todo
We need to link to the high-level API documentation for descriptions of what the various objects here mean.
ReferenceSets
Within the data directory there must be a directory called referenceSets.
Within this directory, each directory is interpreted as containing a
ReferenceSet with the directory name mapped to the name of the
reference set. Here is an example of how reference data should be arranged:
references/
    GRCh37.json
    GRCh37/
        1.fa.gz
        1.fa.gz.fai
        1.json
        2.fa.gz
        2.fa.gz.fai
        2.json
        # More references
    GRCh38.json
    GRCh38/
        1.fa.gz
        1.fa.gz.fai
        1.json
        2.fa.gz
        2.fa.gz.fai
        2.json
        # More references
In this example we have two reference sets, with names GRCh37 and GRCh38.
Each reference set directory must be accompanied by a file
in JSON format, which lists the metadata for a given reference. For example,
the GRCh37.json file above might look something like
{
    "description": "GRCh37 primary assembly",
    "sourceUri": "TODO",
    "assemblyId": "TODO",
    "sourceAccessions": [],
    "isDerived": false,
    "ncbiTaxonId": 9606
}
Within a reference set directory is a set of files defining the references
themselves. Each reference object corresponds to three files: the bgzip
compressed FASTA sequences, the FAI index and a JSON file providing the
metadata. There must be exactly one sequence per FASTA file, and the
sequence ID in the FASTA file must be equal to the reference name
(i.e., the first line in 1.fa above should start with >1.)
The JSON metadata required for a reference is similar to a reference set. An example might look something like:
{
    "sourceUri": "TODO",
    "sourceAccessions": [
        "CM000663.2"
    ],
    "sourceDivergence": null,
    "md5checksum": "bb07c91cda4645ad8e75e375e3d6e5eb",
    "isDerived": false,
    "ncbiTaxonId": 9606
}
Datasets
The main container for genetic data is the dataset. Within the
main data directory there must be a directory called datasets.
Within this directory each subdirectory is interpreted as a
dataset of that name. For example, we might have something like:
datasets/
    1kg-phase1
        variants/
            # Variant data
        reads/
            # Read data
    1kg-phase3
        variants/
            # Variant data
        reads/
            # Read data
In this case we specify two datasets with name equal to 1kg-phase1 and
1kg-phase3. These directories contain the read and variant data
within the variants and reads directory, respectively.
Variants
Each dataset can contain a number of VariantSets, each of which basically
corresponds to a VCF file. Because VCF files are commonly split by chromosome
a VariantSet can consist of many VCF files that have consistent metadata.
Within the variants directory, each directory is interpreted as a
variant set with that name. A variant set directory then contains
one or more indexed VCF/BCF files.
Reads
A dataset can contain many ReadGroupSets, and each ReadGroupSet contains
a number of ReadGroups. The reads directory contains a number of BAM
files, each of which corresponds to a single ReadGroupSet. ReadGroups are
then mapped to the ReadGroups that we find within the BAM file.
Example
An example layout might look like:
ga4gh-data/
    referencesSet/
        referenceSet1.json
        referenceSet1/
            1.fa.gz
            1.fa.gz.fai
            1.json
            2.fa.gz
            2.fa.gz.fai
            2.json
            # More references
    datasets/
        dataset1/
            /variants/
                variantSet1/
                    chr1.vcf.gz
                    chr1.vcf.gz.tbi
                    chr2.vcf.gz
                    chr2.vcf.gz.tbi
                    # More VCFs
                variantSet2/
                    chr1.bcf
                    chr1.bcf.csi
                    chr2.bcf
                    chr2.bcf.csi
                    # More BCFs
            /reads/
                sample1.bam
                sample1.bam.bai
                sample2.bam
                sample2.bam.bai
                # More BAMS
Note
Any change to the data repository (using the repository manager or otherwise) requires a restart of the server to be picked up by the server. The server does not detect changes in the data repository while running.
Repository manager
The repository manager is a tool provided to abstract away the details of
building a data repository behind a convenient command line interface. It can
be accessed via ga4gh_repo (or python repo_dev.py if developing).
Following are descriptions of the commands that the repo manager exposes.
All of the add-* commands take a --moveMode flag which specifies how
to transfer the given file (or directory) into the data repository. The
options are move (moves the file from its original path to the new
path), copy (copies the contents of the file into the data repository) and
link (creates a symlink in the data repository to the file). The
default is link.
Many of the add-* commands take additional flags to specify fields to be
entered into the .json files that are created for the given file.
Utilize the command line help for a particular command to get a list of
these flags.
init
Initializes a data repository at the path provided. All of the other commands require a data repository path as an argument, so this will likely be the first command you run.
$ ga4gh_repo init path/to/datarepo
check
Performs some consistency checks on the given data repository to ensure it is well-formed.
$ ga4gh_repo check path/to/datarepo
destroy
Destroys the given data repository by deleting its directory tree.
$ ga4gh_repo destroy path/to/datarepo
add-dataset
Creates a dataset in the given repository with a given name.
$ ga4gh_repo add-dataset path/to/datarepo aDataset
remove-dataset
Destroys a dataset in the given repository with a given name.
$ ga4gh_repo remove-dataset path/to/datarepo aDataset
add-referenceset
Adds a given reference set file to a given data repository. The file must
have the extension .fa.gz.
$ ga4gh_repo add-referenceset path/to/datarepo path/to/aReferenceSet.fa.gz
remove-referenceset
Removes a given reference set from a given data repository.
$ ga4gh_repo remove-referenceset path/to/datarepo aReferenceSet
add-readgroupset
Adds a given read group set file to a given data repository and dataset. The
file must have the extension .bam.
$ ga4gh_repo add-readgroupset path/to/datarepo aDataset path/to/aReadGroupSet.bam
remove-readgroupset
Removes a read group set from a given data repository and dataset.
$ ga4gh_repo remove-readgroupset path/to/datarepo aDataset aReadGroupSet
add-variantset
Adds a variant set directory to a given data repository and dataset. The
directory should contain file(s) with extension .vcf.gz. If a variant set is annotated it will be added as both a variant set and a variant annotation set.
$ ga4gh_repo add-variantset path/to/datarepo aDataset path/to/aVariantSet
remove-variantset
Removes a variant set from a given data repository and dataset.
$ ga4gh_repo remove-variantset path/to/datarepo aDataset aVariantSet
Configuration file
The GA4GH reference server is a Flask application and uses the standard Flask configuration file mechanisms. Many configuration files will be very simple, and will consist of just one directive instructing the server where to look for data; for example, we might have
DATA_SOURCE = "/path/to/data/root"
For production deployments, we shouldn’t need to add any more configuration than this, as the other keys have sensible defaults. However, all of Flask’s builtin configuration values are supported, as well as the extra custom configuration values documented here.
When debugging deployment issues, it can be very useful to turn on extra debugging information as follows:
DEBUG = True
Warning
Debugging should only be used temporarily and not left on by default.
Configuration Values
- DEFAULT_PAGE_SIZE
- The default maximum number of values to fill into a page when responding to search queries. If a client does not specify a page size in a query, this value is used.
- MAX_RESPONSE_LENGTH
- The approximate maximum size of a response sent to a client in bytes. This is used to control the amount of memory that the server uses when creating responses. When a client makes a search request with a given page size, the server will process this query and incrementally build a response until (a) the number of values in the page list is equal to the page size; (b) the size of the serialised response in bytes is >= MAX_RESPONSE_LENGTH; or (c) there are no more results left in the query.
- REQUEST_VALIDATION
- Set this to True to strictly validate all incoming requests to ensure that they conform to the protocol. This may result in clients with poor standards compliance receiving errors rather than the expected results.
- RESPONSE_VALIDATION
- Set this to True to strictly validate all outgoing responses to ensure that they conform to the protocol. This should only be used for development purposes.
- OIDC_PROVIDER
- If this value is provided, then OIDC is configured and SSL is used. It is the URI of the OpenID Connect provider, which should return an OIDC provider configuration document.
- OIDC_REDIRECT_URI
- The URL of the redirect URI for OIDC. This will be something like
https://SERVER_NAME:PORT/oauth2callback. During testing (and particularly in automated tests), if TESTING is True, we can have this automatically configured, but this is discouraged in production, and fails if TESTING is not True. - OIDC_CLIENT_ID, OIDC_CLIENT_SECRET
- These are the client id and secret arranged with the OIDC provider, if client registration is manual (google, for instance). If the provider supports automated registration they are not required or used.
- OIDC_AUTHZ_ENDPOINT, OIDC_TOKEN_ENDPOINT, OIDC_TOKEN_REV_ENDPOINT
- If the authorization provider has no discovery document available, you can set the authorization and token endpoints here.
OpenID Connect Providers
The server can be configured to use OpenID Connect (OIDC) for authentication. As an example, here is how one configures it to use Google as the provider.
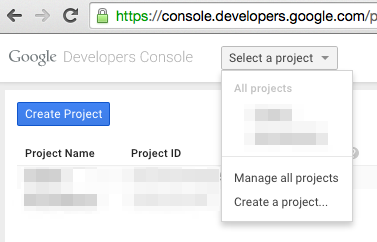
Go to https://console.developers.google.com/project and in create a project.
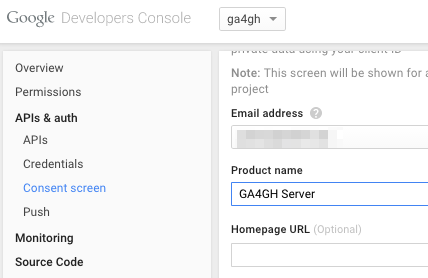
Navigate to the project -> APIs & auth -> Consent Screen and enter a product name
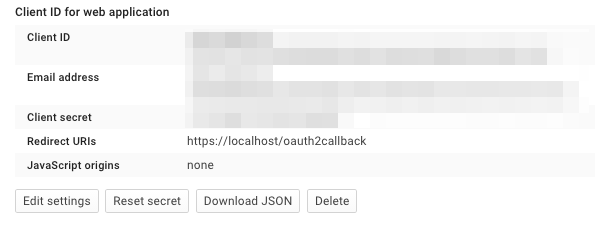
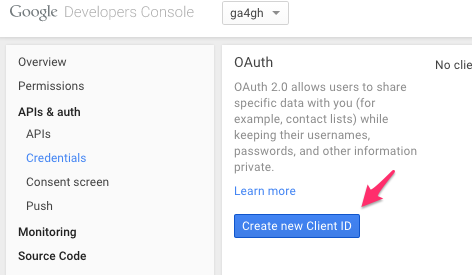
Navigate to project -> APIs & auth -> Credentials, and create a new client ID.
Create the client as follows:
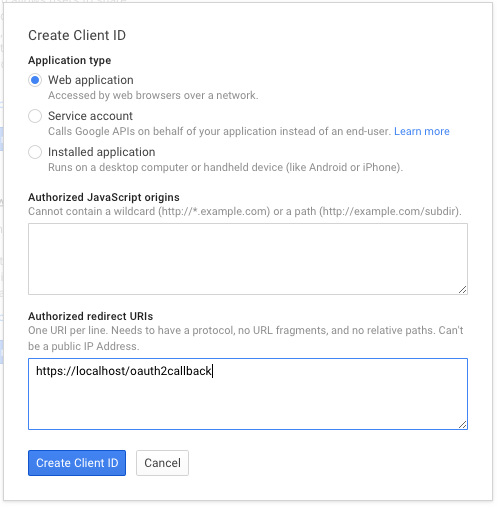
Which will give you the necessary client id and secret. Use these in the OIDC configuration for the GA4GH server, using the OIDC_CLIENT_ID and OIDC_CLIENT_SECRET configuration variables. The Redirect URI should match the OIDC_REDIRECT_URI configuration variable, with the exception that the redirect URI shown at google does not require a port (but the configuration variable does)